In the evolving landscape of software development, the importance of integrating security practices into every phase of the software development lifecycle (SDLC) cannot be overstated.
This is where DevSecOps comes into play a philosophy that emphasizes the need to incorporate security as a shared responsibility throughout the entire development process, rather than treating it as an afterthought.
By shifting security left, organizations can detect vulnerabilities earlier, reduce risks, and improve compliance with industry standards. DevSecOps isn’t just about tools; it’s about creating a culture where developers, security teams, and operations work together seamlessly. However, having the right tools is essential to implementing an effective DevSecOps strategy.
In this article, we’ll delve into the setup of DefectDojo, a powerful open-source vulnerability management tool, and demonstrate how to integrate it with SonarQube to automate Code Analysis as part of the CICD Process and also capture the vulnerability identified in the testing so it can be tracked to closure.
Why DevSecOps and What Tools to Use?
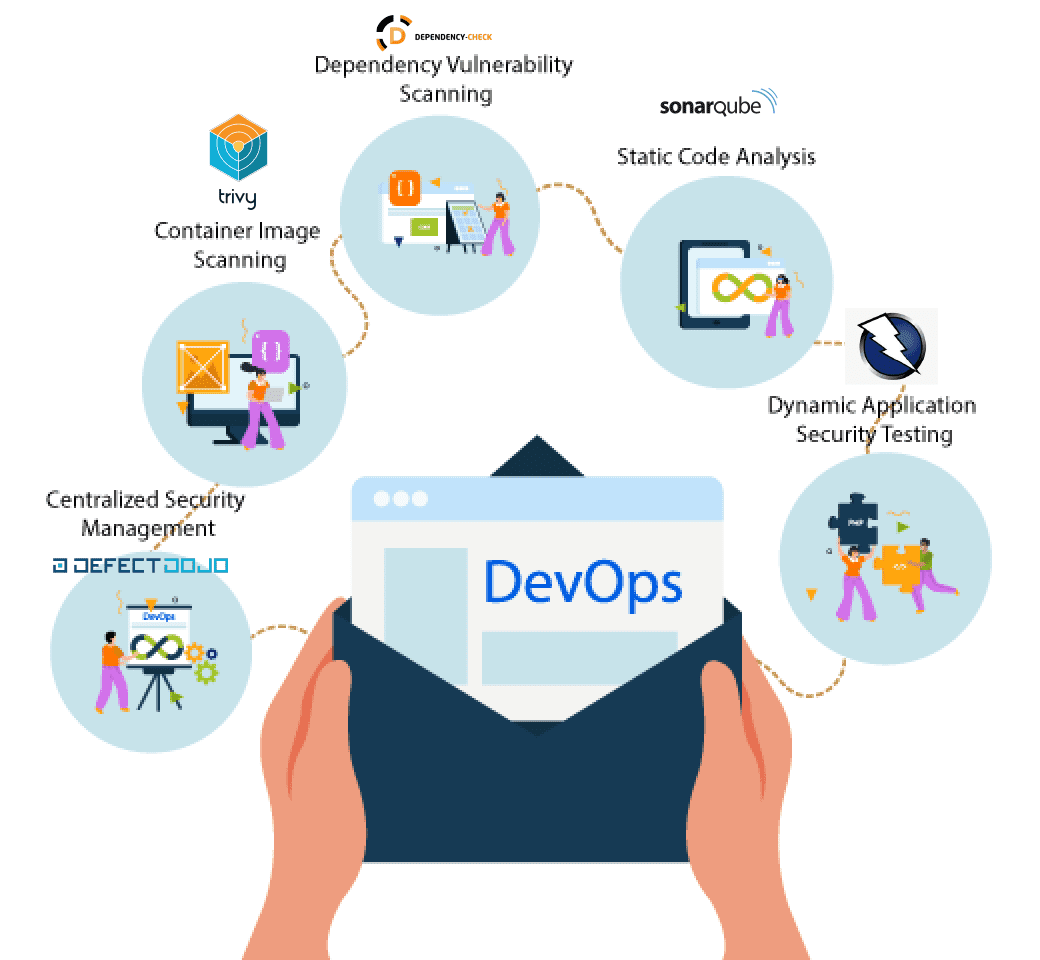
DevSecOps aims to automate security processes, ensuring that security is built into the CI/CD pipeline without slowing down the development process. Here are some key tools that can be used in a DevSecOps environment:
SonarQube: Static Code Analysis
SonarQube inspects code for bugs, code smells, and vulnerabilities, providing developers with real-time feedback on code quality. It helps identify and fix issues early in the development process, ensuring cleaner and more maintainable code.

Dependency Check: Dependency Vulnerability Scanning
Dependency Check scans project dependencies for known vulnerabilities, alerting teams to potential risks from third-party libraries. This tool is crucial for managing and mitigating security risks associated with external code components.

Trivy: Container Image Scanning
Trivy examines Docker images for vulnerabilities in both OS packages and application dependencies. By integrating Trivy into the CI/CD pipeline, teams ensure that the container images deployed are secure, reducing the risk of introducing vulnerabilities into production.
ZAP: Dynamic Application Security Testing
ZAP performs dynamic security testing on running applications to uncover vulnerabilities that may not be visible through static analysis alone. It helps identify security issues in a live environment, ensuring that the application is secure from real-world attacks.
Defect Dojo: Centralized Security Management
Defect Dojo collects and centralizes security findings from SonarQube, Dependency Check, Trivy, and ZAP, providing a unified platform for managing and tracking vulnerabilities. It streamlines the process of addressing security issues, offering insights and oversight to help prioritize and resolve them efficiently.

DefectDojo ties all these tools together by acting as a central hub for vulnerability management. It allows security teams to track, manage, and remediate vulnerabilities efficiently, making it an essential tool in the DevSecOps toolkit.
Installation and Setup of DefectDojo
Before integrating DefectDojo with your security tools, you need to install and configure it. Here’s how you can do that:
Prerequisites:

Step1: Download the official documentation from DefectDojo github repository using the link
Step2: Once downloaded, navigate to the path where you have downloaded the repository and run the below command.
docker-compose up -d –-build |
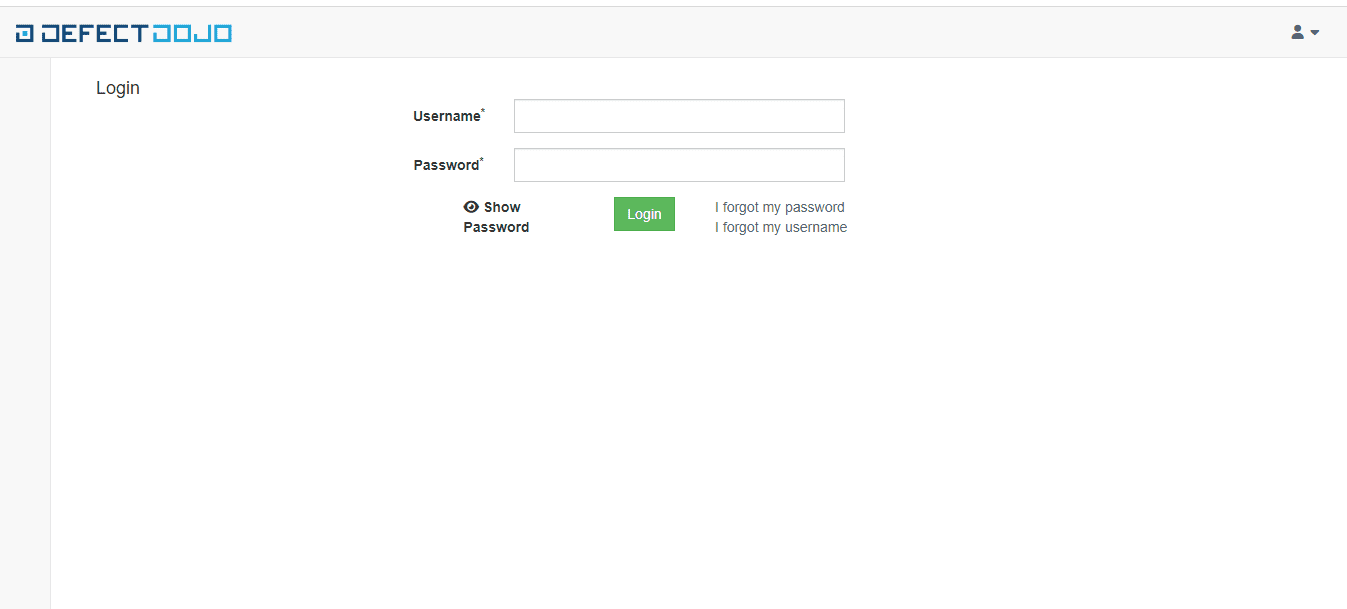
Step3: DefectDojo will start running and you will be able to access it with http://localhost:8080/ . Enter the default credentials that you have set and login to the application.
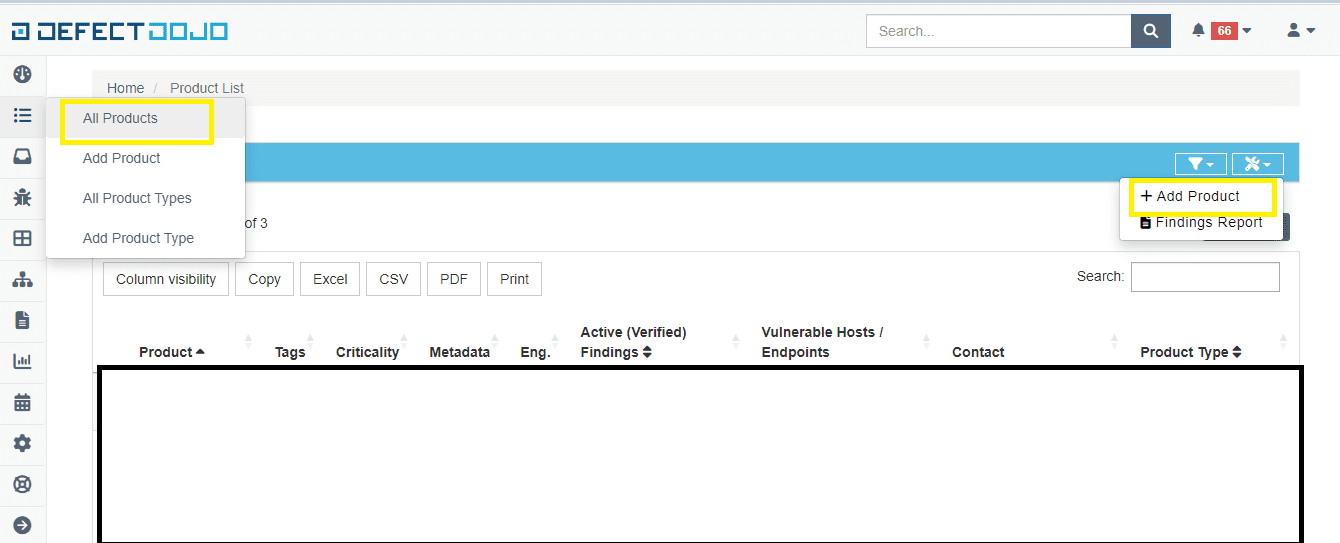
Step4: Create a product by navigating as shown below
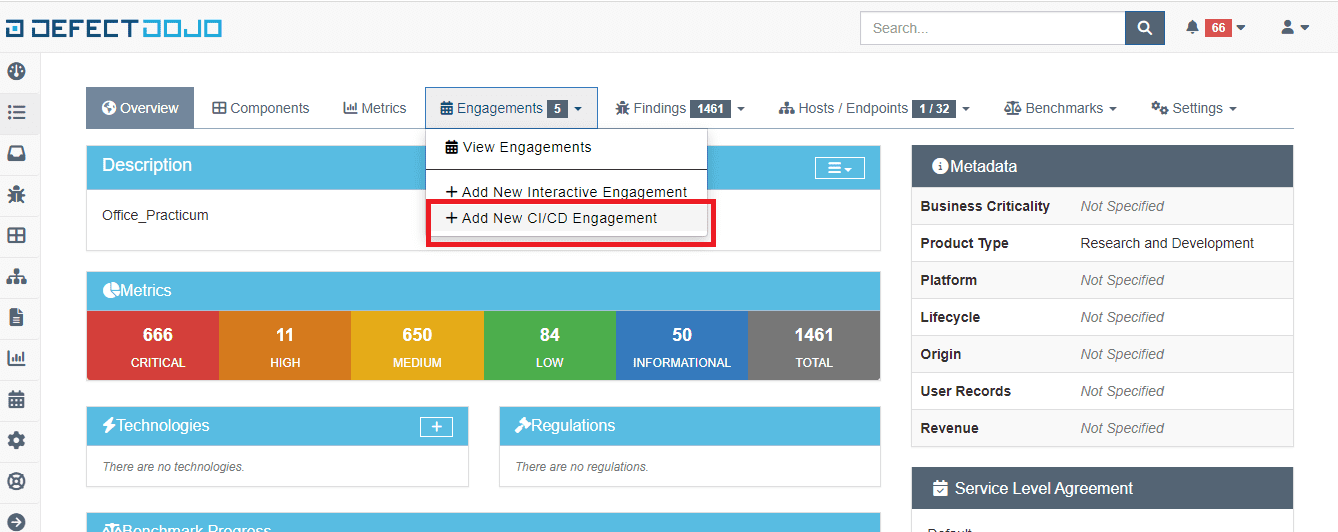
Step5: Click on the created product name and create an engagement by navigating as shown below
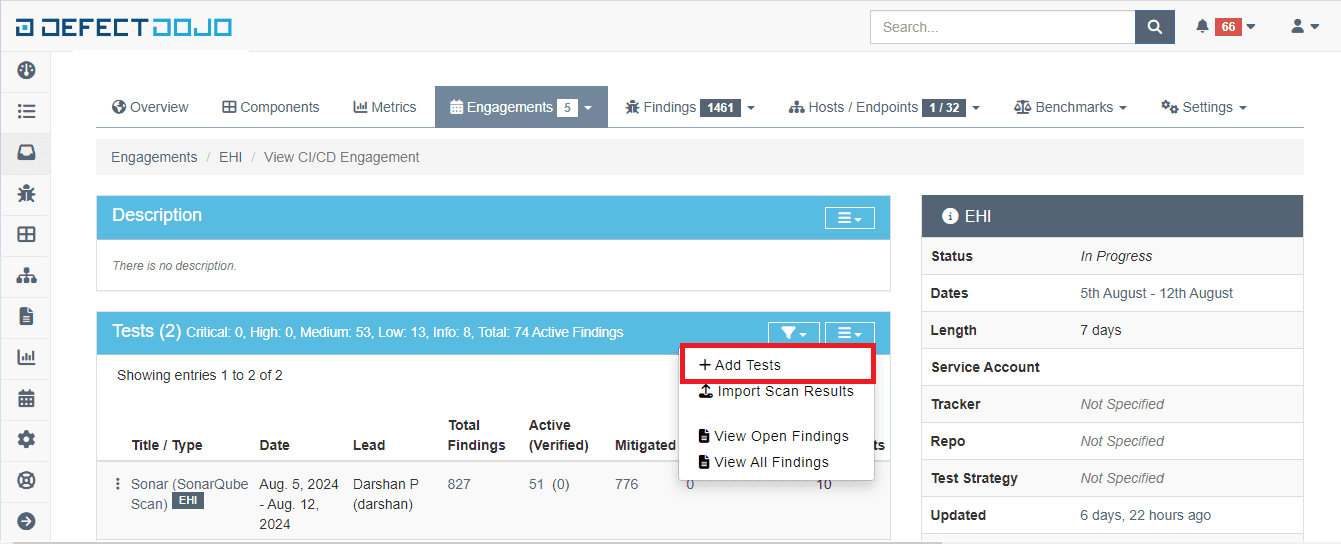
Step6: Once an engagement is created click on the created engagement name and create a test from it.
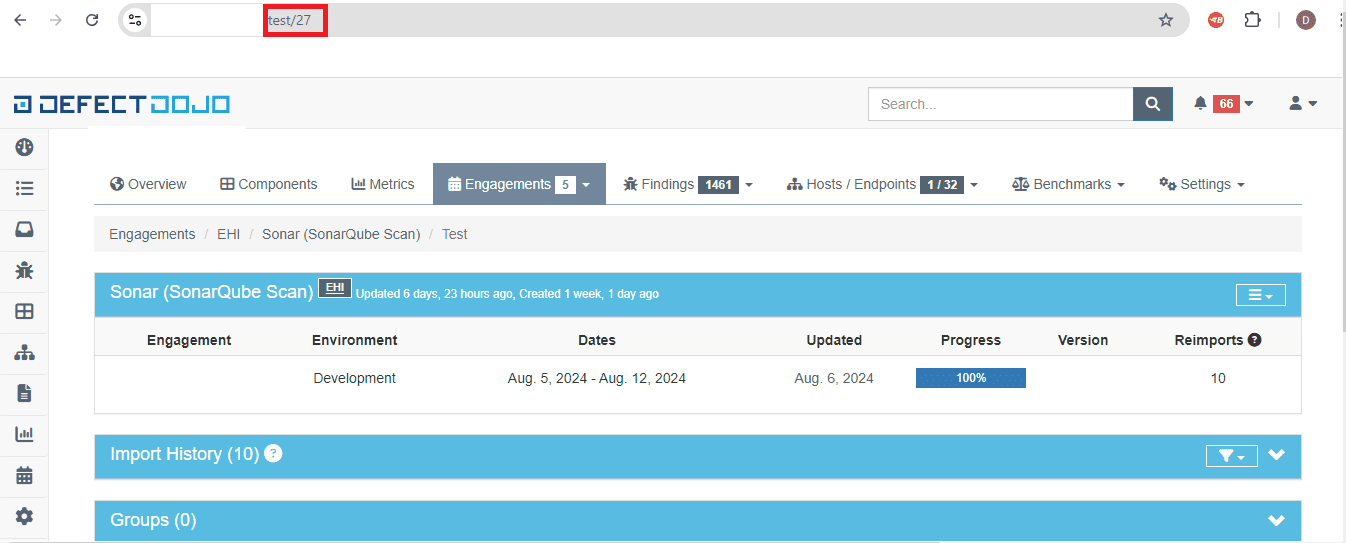
Step7: Copy the test number and enter the test number in the post stage of the pipeline.
Step8: Building a pipeline in Jenkins to integrate it with DefectDojo inorder to generate vulnerability report
pipeline { agent { label ‘Agent-1’ } environment { SONAR_TOKEN = credentials(‘sonarqube’) } stages { stage(‘Checkout’) { steps { checkout([$class: ‘GitSCM’, branches: [[name: ‘dev’]], userRemoteConfigs: [[credentialsId: ‘parameterized credentials’, url: ‘repositoryURL’]] ]) } } stage(‘SonarQube Analysis’) { steps { script { withSonarQubeEnv(‘Sonarqube’) { def scannerHome = tool name: ‘sonar-scanner’, type: ‘hudson.plugins.sonar.SonarRunnerInstallation’ def scannerCmd = “${scannerHome}/bin/sonar-scanner” sh “${scannerCmd} -Dsonar.projectKey=ProjectName -Dsonar.sources=./ -Dsonar.host.url=Sonarqubelink -Dsonar.login=${SONAR_TOKEN} -Dsonar.java.binaries=./” } } } } // Other stages… stage(‘Generate SonarQube JSON Report’) { steps { script { def SONAR_REPORT_FILE = “/path/for/.jsonfile” sh “”” curl -u ${SONAR_TOKEN}: \ “Sonarqube URL” \ -o ${SONAR_REPORT_FILE} “”” } } } } post { always { withCredentials([string(credentialsId: ‘Defect_Dojo_Api_Key’, variable: ‘API_KEY’)]) { script { def defectDojoUrl = ‘Enter the defect dojo URL’ // Replace with your DefectDojo URL def testId = ’14’ // Replace with the correct test ID def scanType = ‘SonarQube Scan’ def tags = ‘Enter the tag name’ def SONAR_REPORT_FILE = “/path/where/.json/file is present” sh “”” curl -X POST \\ ‘${defectDojoUrl}’ \\ -H ‘accept: application/json’ \\ -H ‘Authorization: Token ${API_KEY}’ \\ -H ‘Content-Type: multipart/form-data’ \\ -F ‘test=${testId}’ \\ -F ‘file=@${SONAR_REPORT_FILE};type=application/json’ \\ -F ‘scan_type=${scanType}’ \\ -F ‘tags=${tags}’ “”” } } } } } |
The entire script is wrapped in a pipeline block, defining the CI/CD pipeline in Jenkins.
agent: Specifies the Jenkins agent (node) where the pipeline will execute. The label Agent-1 indicates that the pipeline should run on a node with that label.
environment: Defines environment variables for the pipeline.
SONAR_TOKEN: Retrieves the SonarQube authentication token from Jenkins credentials using the ID ‘sonarqube’. This token is needed to authenticate with the SonarQube server during analysis.
The pipeline includes several stages, each performing a specific task.
stage(‘Checkout’): The first stage checks out the code from the Git repository.
checkout: This is a Jenkins step that uses the GitSCM plugin to pull code from the specified branch.
branches: Indicates which branch (dev) to checkout.
userRemoteConfigs: Specifies the Git repository’s URL and the credentials ID (parameterized credentials) used to access the repository.
stage(‘SonarQube Analysis’): This stage runs a SonarQube analysis on the checked-out code.
withSonarQubeEnv(‘Sonarqube’): Sets up the SonarQube environment using the SonarQube server named Sonarqube, which is configured in Jenkins.
tool name: Locates the SonarQube scanner tool installed on the Jenkins agent.
sh: Executes the SonarQube scanner command with the following parameters:
-Dsonar.projectKey=ProjectName: Specifies the project key in SonarQube.
-Dsonar.sources=./: Specifies the source directory for the analysis (in this case, the root directory).
-Dsonar.host.url=Sonarqubelink: Specifies the SonarQube server URL.
-Dsonar.login=${SONAR_TOKEN}: Uses the SonarQube token for authentication.
-Dsonar.java.binaries=./: Points to the location of Java binaries (if applicable) for analysis.
stage(‘Generate SonarQube JSON Report’): This stage generates a JSON report of the SonarQube analysis.
SONAR_REPORT_FILE: Defines the path where the JSON report will be saved.
sh: Runs a curl command to retrieve the SonarQube issues data in JSON format:
- -u ${SONAR_TOKEN}:: Uses the SonarQube token for authentication.
- “Sonarqube URL”: Specifies the API endpoint to fetch the issues from SonarQube.
- -o ${SONAR_REPORT_FILE}: Saves the JSON response to the specified file path.
post: Defines actions to perform after the pipeline stages are complete. The always block ensures that the following steps are executed regardless of the pipeline’s success or failure.
withCredentials: Securely retrieves the DefectDojo API key from Jenkins credentials using the ID ‘Defect_Dojo_Api_Key’.
script: Contains the script block where the DefectDojo integration happens.
defectDojoUrl: The URL of the DefectDojo API endpoint for reimporting scans.
testId: The specific test ID in DefectDojo where the SonarQube report will be uploaded.
scanType: Indicates the type of scan (in this case, SonarQube Scan).
tags: Tags the scan in DefectDojo.
SONAR_REPORT_FILE: Points to the JSON file generated earlier.
sh: Runs a curl command to POST the SonarQube JSON report to DefectDojo:
-X POST: Specifies that this is a POST request.
-H ‘accept: application/json’: Indicates that the response should be in JSON format.
-H ‘Authorization: Token ${API_KEY}’: Authenticates with DefectDojo using the API key.
-F ‘test=${testId}’: Specifies the test ID in DefectDojo.
-F ‘file=@${SONAR_REPORT_FILE};type=application/json’: Uploads the JSON file as part of the request.
-F ‘scan_type=${scanType}’: Indicates the type of scan being uploaded.
-F ‘tags=${tags}’: Adds any specified tags to the scan in DefectDojo.
Step 9: Verify the Integration
After the pipeline executes, the vulnerability report generated by SonarQube will be available in DefectDojo under the corresponding engagement. You can now track, manage, and remediate these vulnerabilities using DefectDojo’s robust features.
Conclusion
Integrating security tools like SonarQube with DefectDojo is a critical step in building a secure DevSecOps pipeline. By automating vulnerability management and integrating it directly into your CI/CD pipeline, you can ensure that security remains a top priority throughout the development process.
In this article, we focused on setting up DefectDojo and integrating it with SonarQube. In future articles, we will cover the integration of additional tools like OWASP ZAP, Trivy, and Dependency-Check. Stay tuned to further enhance your DevSecOps practices.
Frequently Asked Questions (FAQs)
DefectDojo is an open-source application security vulnerability management tool. It helps organizations in managing, tracking, and remediating security vulnerabilities efficiently. It integrates with a variety of security tools for automating workflows and provides continuous security monitoring throughout the SDLC.
The prerequisites for setting up DefectDojo are Docker, to run DefectDojo inside a container, and Jenkins, for integrating pipelines in CI/CD.
To install DefectDojo:
- Download the official DefectDojo documentation from its GitHub repository.
- Navigate to the path where you downloaded the repository.
- Run the docker-compose up -d --build command to build and start the DefectDojo container and its dependencies.
Once DefectDojo is running, you can access it via a web browser at http://localhost:8080/. Log in with the credentials set during installation, and you can start managing security vulnerabilities by creating products, engagements, and tests.
Yes, DefectDojo integrates seamlessly with other security tools like SonarQube, OWASP ZAP, Trivy, and Dependency-Check. It allows the centralization of vulnerability management across multiple tools, making it an indispensable part of the DevSecOps pipeline.
Get in touch with us and elevate your software security and performance